request a demo
Stop me if any of these sound familiar: inspection reports, customized invoices, certificates of destruction, install checklists, pre-authorization signoffs, maintenance contracts. If you do business in the field service industry, one or more of these forms likely functions as a fixture in your daily life. In fact, your forms rank among the most useful and important aspects of your business. The very creation of your first form probably elevated your company from a hobby to a real business. As your business grows, so does your need for new forms. From certificates and checklists to internal documents like job applications and employment agreements, you’ll need a steady supply of documentation to keep the lights on. For this reason, it pays to learn how to make your own forms. ...which is actually easier than you’d think! In this article, we'll take a look at the best way to create and implement forms for daily use.
How to Make a PDF Form
First, a quick word about what not to do: don’t scan anything. A scanned paper form is going to be darker, shadowy, and (I’m going to be real with you here) it will look crappy. Easy as it may seem, scanning won’t give you that clean, professional look that you want. If you don’t want to go through the process of creating a from yourself (due to a lack of time, personnel, or general interest) you can find some generic, downloadable form options floating around on the internet. In fact, we just created a downloadable HVAC invoice form for this very reason! In the long run however, you might consider crafting one in something like Microsoft Word (built into Windows operating systems) or Google Docs (available for free with an internet connection). This will give you something more tailored to your business’ specific needs. When creating a form, you should first ask yourself what you’ll need from it later (things like customer information, line items, and signatures). List the elements you need to include. Then, decide how to best showcase that information. You can use columns, grids, text boxes, images, and anything else you think you’ll need. You’ll find the ability to create these elements in Microsoft Word or Google Docs. Below you’ll find an example of a chimney sweep form with a diagram in which field workers can notate specific areas as passing or failing an inspection. This form hits all the marks: a logo, a clear form name, and an easy way to input and understand the information included.

Once you’ve created your form, just save it as a PDF and print as many as you need. (See? I told you it wasn’t too painful.)
Integrating Fillable PDF Forms with Field Service Scheduling Software
When your business expands and you start using scheduling and dispatching software, things change a little bit. For best results, choose a software that integrates your forms fully into the system. For instance, the Smart Service mobile app has a forms button available on every open job.

You can even customize which forms appear on which devices by only sending them to specific technicians. Forms set up to work with Smart Service pre-fill a lot of information (contact info, dates, job types, etc.), leading to reduced data entry errors and increased time savings. Digitized forms within Smart Service allow your field technicians to collect signatures before or after a job, supply customers with certificates of destruction, and fill out checklists or inspection reports, among other things. All of that paperwork now fits in the palm of their hands, making for the most streamlined system available. Once a form is complete and a job is closed, that form is added to the customer file and sent back to the office for your dispatchers/bookkeepers to look at without any additional steps. No muss, no fuss. Just business.
Setting Up a Form for Use in Smart Service
Smart Service provides a built-in work order for use with the mobile app, but if you already created your form exactly how you wanted it, we don’t blame you for deciding to keep it. Smart Service has a system that completely supports your decision to use customized forms, and we even make it easy to do so.
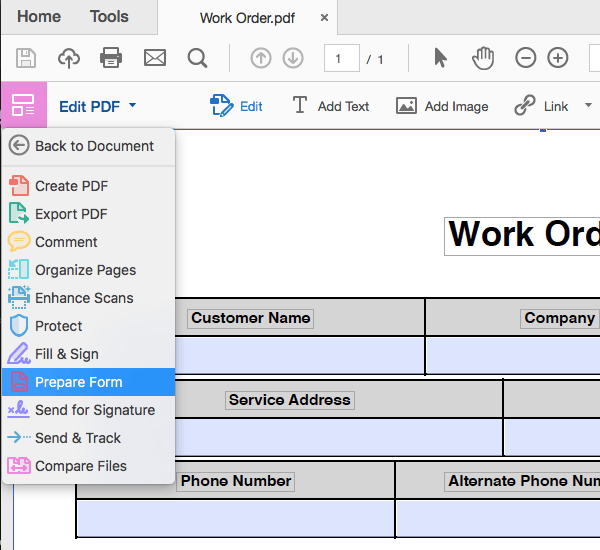
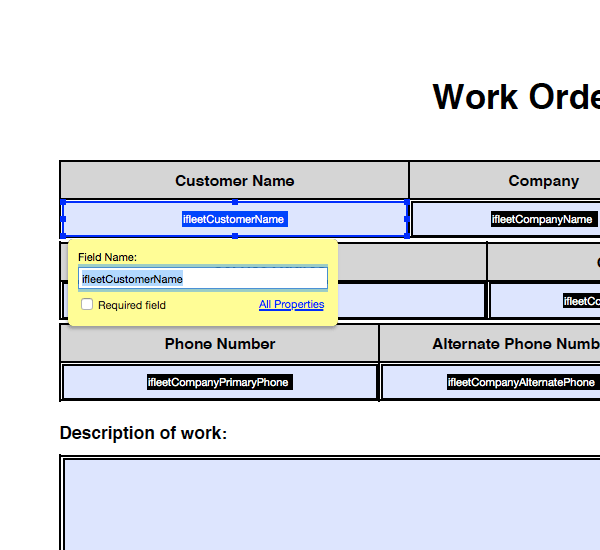
Take the PDF that you created from Word or Google Docs and open it in Adobe Acrobat DC Pro. This is where the magic happens. By magic, I really just mean inserting codes. You can learn more about Adobe Acrobat DC Pro specifics at their FAQ page, but it is essentially a PDF software that allows you to do certain things like add special codes to form fields that make the form electronically fillable. This page on our Knowledgebase provides seven pages of preset codes that automatically populate information when used in conjunction with our mobile app. Once you open Adobe Acrobat DC Pro, you’ll click “Prepare Form” on the drop down menu under “Edit PDF”.

This will let you place boxes and insert the preset codes that will turn the process of filling forms into an error free experience.

This may seem difficult at first, but once you’ve tried to create a form or two, you’ll find the whole process an intuitive, rewarding pursuit. Building this skill will increase your professional prospects and your value to your company.
Lost? Overwhelmed? Hire us!
We encourage customers to make their own forms for all the reasons listed above. However, maybe you still think the whole thing is too much. You want the customization, but don’t have the time or personnel to make it happen on your own. We get it. Luckily, Smart Service offers a form building service. We can design and build a custom form for you, or in the event that something has gone wrong halfway through your own form building adventure, we can step in and fix any work-in-progress forms. To take advantage of this service, just give us a call at 888-518-0818 or fill out our Custom Development Request Form. Forms are a hallmark of Smart Service field service management software. The customization and simple implementation means that you can do business more efficiently than you ever have before, using digital versions the same forms you’ve always used. Our training team recently conducted a webinar on PDF form integration. To view a recording of this webinar, simply click here.


